How is a Henna Tattoo Done? A Comprehensive Guide
Henna tattoos, also known as mehndi, are a beautiful and temporary form of body art that has been practiced for centuries. Originating in South Asia, the Middle East, and Africa, henna is used to adorn the body for celebrations, rituals, and personal expression. If you’re curious about how is a henna tattoo done and want to understand the process involved, this comprehensive guide will walk you through each step. From preparing the henna paste to applying and caring for your design, you’ll gain a thorough understanding of this ancient art form.
Understanding Henna and its Origins
Before diving into the application process, it’s essential to understand what henna is and its cultural significance. Henna is a natural dye derived from the leaves of the henna plant (Lawsonia inermis). The leaves are dried, crushed into a fine powder, and then mixed with liquids to create a paste. This paste is then applied to the skin, staining it a reddish-brown color. The color intensity depends on various factors, including skin type, body temperature, and the quality of the henna paste.
Henna holds deep cultural meaning in many societies. In Indian weddings, for example, the application of henna is an elaborate ceremony symbolizing good luck, prosperity, and the bond between the bride and groom. In other cultures, henna is used for religious festivals, rites of passage, and simply as a form of adornment. Understanding the cultural context of henna adds a layer of appreciation to the art form.
Preparing the Henna Paste: The Crucial First Step
The quality of the henna paste is paramount to achieving a vibrant and long-lasting henna tattoo. You can either purchase pre-made henna cones or create your own paste from scratch. Making your own allows you to control the ingredients and ensure the henna is fresh and natural.
Ingredients for Homemade Henna Paste:
- Henna powder (ensure it’s body art quality)
- Lemon juice (acts as a mordant, enhancing the stain)
- Essential oil (such as lavender, tea tree, or eucalyptus – these contain monoterpenes that help release the dye)
- Sugar (helps create a smooth consistency and keeps the paste moist)
Steps to Make Henna Paste:
- Sift the henna powder: Use a fine sieve to remove any lumps and ensure a smooth powder.
- Mix with lemon juice: Gradually add lemon juice to the henna powder, mixing until you achieve a thick, yogurt-like consistency.
- Add essential oil: Incorporate a few drops of essential oil. The oil helps to release the lawsone (the dye molecule) from the henna powder.
- Add sugar: Add a small amount of sugar to improve the paste’s texture and moisture retention.
- Let it rest: Cover the paste tightly and let it sit for at least 24 hours in a warm place. This allows the dye to release fully.
- Check the consistency: After 24 hours, check the consistency. It should be smooth, thick, and easily pipeable. If it’s too thick, add a little more lemon juice. If it’s too thin, add a bit more henna powder.
Using a good quality henna powder is essential. Look for henna powder specifically labeled for body art, as some henna powders may contain additives that can be harmful to the skin. Also, avoid “black henna,” which contains a chemical dye called paraphenylenediamine (PPD) that can cause severe allergic reactions and permanent scarring. Always opt for natural henna, which stains the skin a reddish-brown color.
Preparing the Skin for Henna Application
Proper skin preparation is crucial for achieving the best possible henna stain. Clean skin allows the henna paste to adhere properly and ensures maximum dye absorption.
Steps to Prepare the Skin:
- Clean the area: Wash the area where you’ll be applying the henna with soap and water. Remove any lotions, oils, or makeup.
- Exfoliate: Gently exfoliate the skin to remove dead skin cells. This will help the henna penetrate deeper and create a darker, longer-lasting stain.
- Dry thoroughly: Ensure the skin is completely dry before applying the henna paste.
Avoid applying any moisturizers or oils to the skin before applying henna, as these can create a barrier that prevents the henna from staining properly. A clean, dry surface is the ideal canvas for your henna design.
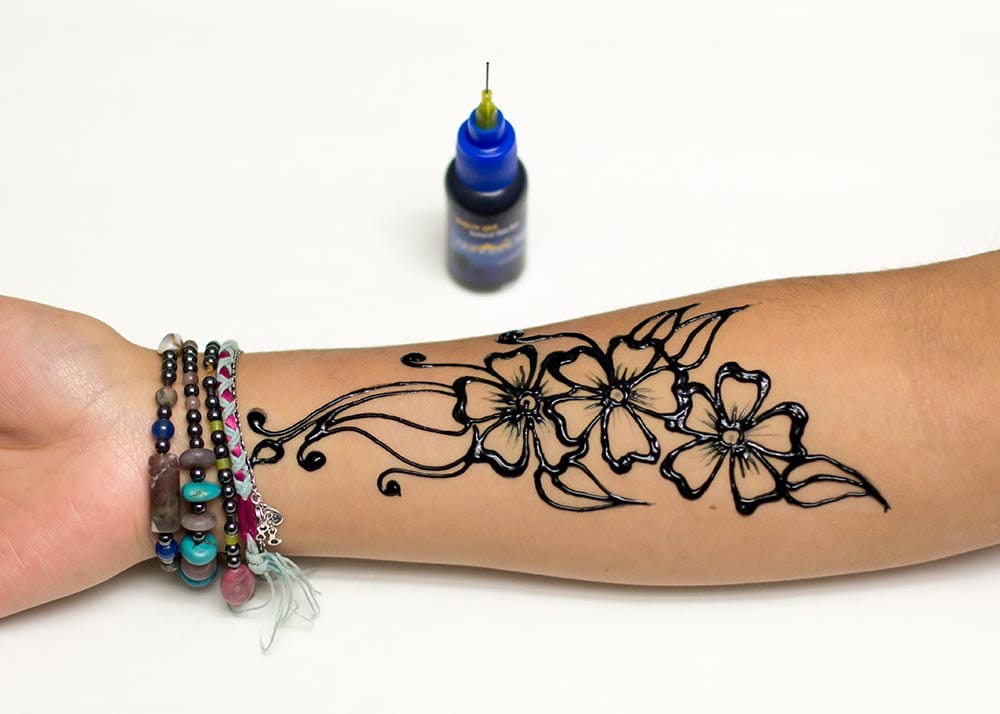
Applying the Henna Paste: Techniques and Tools
Once your henna paste is ready and your skin is prepared, it’s time to apply the henna. There are several techniques and tools you can use, depending on your skill level and the complexity of the design.
Tools for Applying Henna:
- Henna cones: These are pre-rolled cones filled with henna paste. They are easy to use and allow for precise application. You can purchase pre-filled cones or make your own by rolling plastic sheets into a cone shape and filling them with your homemade paste.
- Applicator bottles: These bottles have a fine tip and are ideal for creating intricate designs. They are similar to henna cones but offer more control and precision.
- Toothpicks or orange sticks: These can be used to correct mistakes or to create fine details in your design.
- Stencils: If you’re not confident in your freehand skills, stencils can be a great way to create complex designs. Simply place the stencil on your skin and apply the henna paste over it.
Applying the Henna Paste:
- Hold the cone or applicator bottle: Hold the cone or bottle like a pen, with a comfortable grip.
- Apply gentle pressure: Gently squeeze the cone or bottle to release the henna paste. Apply even pressure to create consistent lines.
- Follow your design: Carefully follow your chosen design, whether it’s a freehand creation or a stencil.
- Correct mistakes: If you make a mistake, use a toothpick or orange stick to gently remove the unwanted paste.
- Layer the henna (optional): For a darker stain, you can apply multiple layers of henna paste. Allow each layer to dry slightly before applying the next.
Practice makes perfect when it comes to applying henna. Start with simple designs and gradually work your way up to more complex patterns. Don’t be afraid to experiment and find the techniques that work best for you.
Caring for Your Henna Tattoo: Maximizing the Stain
Proper aftercare is essential for achieving a dark and long-lasting henna stain. The key is to keep the henna paste in contact with the skin for as long as possible and to protect the stain from water.
Steps for Henna Aftercare:
- Keep the paste moist: After applying the henna, keep the paste moist by dabbing it with a mixture of lemon juice and sugar. This helps the henna release more dye into the skin.
- Wrap the area (optional): Wrapping the area with medical tape or a bandage can help keep the paste in contact with the skin and protect it from smudging.
- Keep it warm: Keeping the area warm can help enhance the stain. You can use a hair dryer on a low setting to gently warm the henna paste.
- Avoid water: Avoid washing the area for as long as possible, ideally for at least 2-6 hours. Water can prevent the henna from staining properly.
- Remove the paste: After the recommended time, gently scrape off the dried henna paste. Avoid washing it off with water.
- Apply natural oil: After removing the paste, apply a natural oil such as coconut oil, olive oil, or sesame oil to the stained area. This helps to moisturize the skin and protect the stain.
The longer you can keep the henna paste on your skin, the darker the stain will be. Some people leave the paste on overnight for maximum results. Also, avoid using harsh soaps or exfoliants on the stained area, as these can fade the stain prematurely. [See also: How to Make Henna Paste Darker]
Factors Affecting Henna Stain Darkness
Several factors can influence the darkness and longevity of a henna stain. Understanding these factors can help you achieve the best possible results.
- Skin type: Henna stains darker on areas of the body with thicker skin, such as the palms and soles of the feet.
- Body temperature: Warmer body temperatures help the henna stain darker.
- Henna quality: The quality of the henna powder and the freshness of the paste play a significant role in the stain’s darkness.
- Aftercare: Proper aftercare, including keeping the paste moist and avoiding water, is crucial for a dark and long-lasting stain.
- Essential oils: The type and quality of essential oil used in the henna paste can affect the stain’s darkness.
Common Mistakes to Avoid
While applying a henna tattoo may seem straightforward, there are several common mistakes that can hinder the process and result in a poor stain.
- Using low-quality henna: Always use body art quality henna powder to avoid harmful additives.
- Using black henna: Avoid black henna at all costs, as it contains PPD, which can cause severe skin reactions.
- Not preparing the skin properly: Ensure the skin is clean, dry, and free of oils before applying henna.
- Not keeping the paste moist: Keep the henna paste moist with lemon juice and sugar to enhance the stain.
- Washing off the paste too soon: Allow the henna paste to stay on the skin for as long as possible for maximum results.
- Exposing the stain to water too soon: Avoid washing the area for at least 2-6 hours after removing the paste.
Henna Tattoo Designs and Inspiration
The possibilities for henna tattoo designs are endless. From simple geometric patterns to intricate floral motifs, there’s a design to suit every taste and occasion. [See also: Henna Tattoo Design Ideas]
Popular Henna Designs:
- Floral patterns: These are among the most popular henna designs, featuring intricate flowers, leaves, and vines.
- Geometric patterns: These designs incorporate geometric shapes such as circles, squares, and triangles.
- Paisley patterns: Paisley is a classic henna design element that adds a touch of elegance and sophistication.
- Tribal patterns: These designs are inspired by traditional tribal art and often feature bold lines and geometric shapes.
- Custom designs: You can create your own unique henna design by combining different elements and patterns.
Look for inspiration in books, online resources, and cultural traditions. Don’t be afraid to experiment and create your own unique designs. Henna is a form of self-expression, so let your creativity shine!
Conclusion: Embracing the Art of Henna
Understanding how is a henna tattoo done involves mastering several key steps, from preparing the henna paste to applying and caring for your design. By following the guidelines outlined in this comprehensive guide, you can create beautiful and temporary body art that celebrates the rich cultural heritage of henna. Whether you’re adorning yourself for a special occasion or simply expressing your creativity, henna offers a unique and enchanting way to connect with tradition and beauty. Remember to always use natural henna, prepare your skin properly, and care for your stain to achieve the best possible results. Happy henna-ing!
