Acrylic Nails Ombre: A Comprehensive Guide to Achieving the Perfect Fade
Ombre nails, a stunning gradient effect that seamlessly blends one color into another, have become a staple in the nail art world. Among the various methods for achieving this look, acrylic nails ombre stands out for its durability, versatility, and the flawless finish it provides. This comprehensive guide will walk you through everything you need to know about acrylic nails ombre, from the basics to advanced techniques, ensuring you can achieve salon-worthy results at home or make an informed decision when visiting a professional.
What are Acrylic Nails Ombre?
Acrylic nails ombre refers to the application of acrylic nail extensions where the colors are blended together to create a gradient effect. This technique involves using two or more acrylic powders to create a smooth transition, resulting in a visually appealing and sophisticated nail design. The beauty of acrylic nails ombre lies in its adaptability; it can be customized with a wide range of colors, from subtle nudes to bold and vibrant hues, making it suitable for any occasion and personal style.
Benefits of Choosing Acrylic Nails Ombre
- Durability: Acrylic nails are known for their strength and longevity, making them a practical choice for those who want a long-lasting manicure. The acrylic nails ombre technique doesn’t compromise on this durability, offering a beautiful and robust nail enhancement.
- Versatility: The ombre effect can be achieved with virtually any color combination, allowing for endless creativity and customization. Whether you prefer a subtle nude gradient or a bold, contrasting color palette, acrylic nails ombre can be tailored to your preferences.
- Smooth Finish: When applied correctly, acrylic nails ombre provides a seamless and flawless finish. The blended colors create a smooth transition, resulting in a professional and polished look.
- Customizable Length and Shape: Acrylics allow you to create any length and shape you desire, so you can tailor your acrylic nails ombre to perfectly match your style.
Essential Tools and Materials for Acrylic Nails Ombre
Before you embark on your acrylic nails ombre journey, ensure you have all the necessary tools and materials:
- Acrylic Powders: Choose two or more acrylic powders in the colors you want to blend. Opt for high-quality powders to ensure a smooth and consistent finish.
- Acrylic Liquid (Monomer): This is essential for activating the acrylic powder and creating a workable mixture.
- Acrylic Brush: A good quality acrylic brush is crucial for picking up and applying the acrylic mixture. Look for a brush with a fine tip for precise application.
- Nail Forms or Tips: These are used to extend the length of your nails. Choose the type that best suits your preference and nail shape.
- Nail File and Buffer: These are necessary for shaping and smoothing the acrylic nails.
- Primer: Applying a nail primer helps the acrylic adhere better to the natural nail.
- Top Coat: A top coat seals the acrylic and adds shine, protecting the acrylic nails ombre design.
- Dappen Dish: A small dish to hold the acrylic liquid.
- Dust Brush: To remove any acrylic dust during the application process.
Step-by-Step Guide to Creating Acrylic Nails Ombre
Follow these steps to achieve stunning acrylic nails ombre:
Prepare Your Nails
Start by preparing your natural nails. Push back and trim your cuticles, gently buff the surface of your nails, and cleanse them with alcohol to remove any oils or debris. This will ensure proper adhesion of the acrylic.
Apply Nail Forms or Tips
If you’re using nail forms, attach them securely to your natural nails, ensuring they are properly aligned. If you’re using tips, apply them with nail glue and trim them to your desired length. File and shape the tips to create a smooth transition between the natural nail and the extension.
Apply Primer
Apply a thin layer of nail primer to your natural nails and the extended portion. Allow it to dry completely before proceeding.
Apply the First Acrylic Color
Dip your acrylic brush into the acrylic liquid and then into the first acrylic powder color. Pick up a small bead of acrylic and apply it to the base of your nail, near the cuticle area. Gently pat and blend the acrylic towards the center of the nail. Repeat this process until you have a thin, even layer of the first color covering the base of your nail.
Apply the Second Acrylic Color
Clean your acrylic brush thoroughly before dipping it into the second acrylic powder color. Pick up a small bead of acrylic and apply it to the tip of your nail, blending it towards the center of the nail where it meets the first color. Use gentle patting and blending motions to create a smooth transition between the two colors. The key to a perfect acrylic nails ombre effect is seamless blending.
Build Up the Acrylic
Repeat the application of both acrylic colors, gradually building up the thickness and strength of the nails. Ensure that the transition between the colors remains smooth and seamless. Pay close attention to the apex (the highest point of the nail) to create a balanced and durable structure.
Shape and Refine
Once the acrylic has hardened, use a nail file to shape and refine the nails. Pay attention to the overall shape, length, and symmetry. Use a buffer to smooth out any imperfections and create a flawless surface.
Apply Top Coat
Apply a layer of top coat to seal the acrylic and add shine. This will protect the acrylic nails ombre design and enhance its longevity. Allow the top coat to dry completely before using your hands.
Tips and Tricks for Perfect Acrylic Nails Ombre
- Practice Makes Perfect: Achieving a flawless acrylic nails ombre effect takes practice. Don’t be discouraged if your first attempt isn’t perfect. Keep practicing, and you’ll gradually improve your technique.
- Use High-Quality Products: Investing in high-quality acrylic powders, liquids, and brushes can make a significant difference in the final result.
- Work Quickly: Acrylic hardens quickly, so it’s essential to work efficiently and blend the colors before the acrylic sets.
- Keep Your Brush Clean: Regularly clean your acrylic brush to prevent the acrylic from hardening and damaging the bristles.
- Thin Layers are Key: Applying thin layers of acrylic is better than applying thick layers. Thin layers allow for better control and blending.
- Blend, Blend, Blend: The key to a seamless acrylic nails ombre effect is thorough blending. Take your time and ensure that the colors transition smoothly into each other.
Popular Acrylic Nails Ombre Color Combinations
Here are some popular color combinations to inspire your next acrylic nails ombre design:
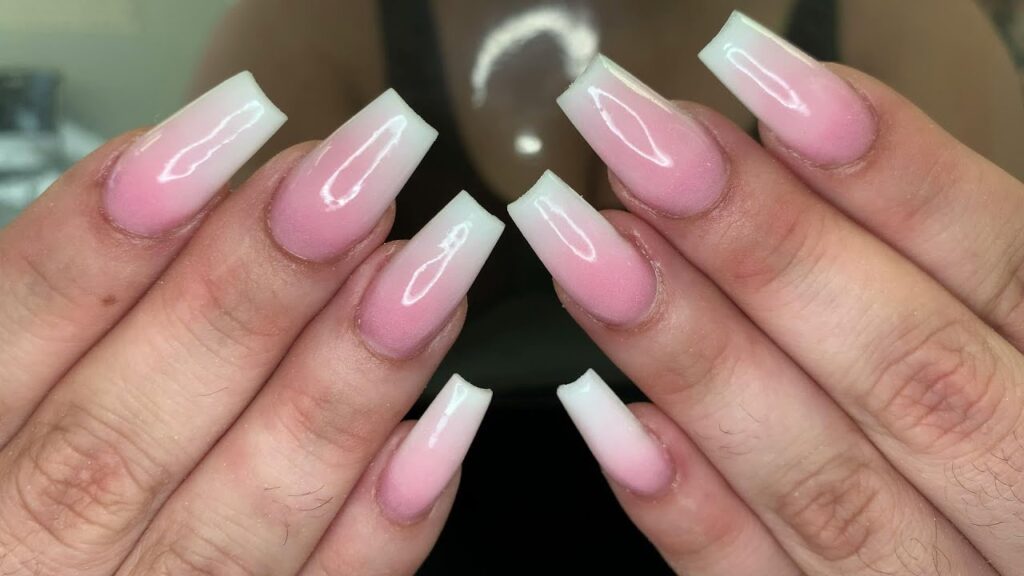
- Nude to White: A classic and elegant combination that’s perfect for any occasion.
- Pink to White: A feminine and romantic choice that adds a touch of sweetness to your look.
- Blue to Purple: A vibrant and eye-catching combination that’s perfect for those who want to make a statement.
- Black to Red: A bold and edgy combination that exudes confidence and style.
- Pastel Colors: A soft and dreamy combination that’s perfect for spring and summer.
Maintaining Your Acrylic Nails Ombre
To keep your acrylic nails ombre looking their best, follow these maintenance tips:
- Regular Fills: Get regular fills every 2-3 weeks to maintain the shape and strength of your acrylic nails.
- Moisturize: Keep your cuticles and surrounding skin moisturized to prevent dryness and cracking.
- Avoid Harsh Chemicals: Wear gloves when handling harsh chemicals to protect your acrylic nails from damage.
- Be Gentle: Avoid using your nails as tools, as this can cause them to break or lift.
Conclusion
Acrylic nails ombre offer a stunning and versatile way to enhance your nails. With the right tools, techniques, and a little practice, you can achieve salon-worthy results at home. Whether you’re a seasoned nail art enthusiast or a beginner, this guide provides you with the knowledge and inspiration to create beautiful and unique acrylic nails ombre designs. So, go ahead and experiment with different colors and techniques to find your perfect ombre style. [See also: Gel Nail Polish vs Acrylic Nails: Which is Right for You?] Remember to prioritize nail health and proper application techniques for long-lasting and beautiful results. The world of acrylic nails ombre is vast and exciting, offering endless possibilities for creativity and self-expression.
