How to Draw a Rose Tattoo: A Comprehensive Guide for Aspiring Artists
Rose tattoos are a timeless and popular choice, symbolizing love, beauty, and passion. If you’re an aspiring artist looking to expand your repertoire, learning how to draw a rose tattoo is a valuable skill. This comprehensive guide will walk you through the process, from basic anatomy to adding intricate details, ensuring you can create stunning rose tattoo designs.
Understanding Rose Anatomy for Tattoo Design
Before you even pick up a pencil, understanding the anatomy of a rose is crucial. Roses aren’t just random collections of petals; they have a specific structure. Familiarize yourself with these key elements:
- Petals: The most recognizable part of the rose. Note how they unfurl from the center, overlapping and creating layers.
- Sepals: The small, green leaves that protect the bud before it blooms. They often curve downwards.
- Stem: The supporting structure, usually adorned with thorns.
- Leaves: Typically compound leaves, meaning they consist of multiple leaflets.
Observing real roses or high-quality photographs will significantly improve your understanding of their form. Pay attention to the subtle curves, folds, and shadows that give roses their realistic appearance. This foundation is essential for learning how to draw a rose tattoo that looks authentic.
Gathering Your Supplies
Having the right tools makes the drawing process smoother and more enjoyable. Here’s what you’ll need:
- Pencils: A range of graphite pencils (2H, HB, 2B, 4B) for sketching and shading.
- Eraser: A kneaded eraser is ideal for lifting graphite without damaging the paper.
- Paper: Smooth drawing paper or Bristol board.
- Reference Images: High-quality photos of roses from different angles.
- Optional: Fine-liner pens for outlining, colored pencils or markers for adding color.
Step-by-Step Guide: How to Draw a Rose Tattoo
Step 1: The Basic Outline
Start with a light sketch of the rose’s overall shape. Think of it as a slightly flattened sphere. This will be the foundation for your rose. Don’t press too hard with your pencil at this stage, as you’ll be erasing and refining the lines later.
Step 2: The Central Bud
Inside the sphere, sketch the tightly curled center of the rose. This is the heart of the flower and the starting point for the petals. Use curved lines to suggest the overlapping layers of the bud. This is a crucial step in learning how to draw a rose tattoo that captures the flower’s essence.
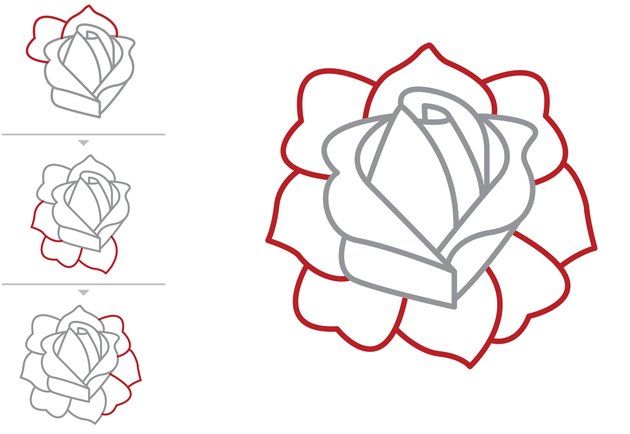
Step 3: Adding the First Layer of Petals
Begin adding the first layer of petals around the central bud. These petals should be small and tightly wrapped. Remember to observe your reference images and pay attention to how the petals curve and overlap. Lightly sketch these in, focusing on the flow of the lines.
Step 4: Building the Second Layer of Petals
Now, add a second layer of petals that are slightly larger and more open than the first. These petals will start to give the rose its characteristic shape. Continue to use curved lines and pay attention to the way the petals fold and bend. Consider the overall composition of your rose tattoo design.
Step 5: Expanding the Petal Structure
Continue adding layers of petals, gradually increasing their size and openness. As you move outwards, the petals will become more relaxed and less tightly curled. Don’t be afraid to experiment with different shapes and sizes to create a more natural look.
Step 6: Adding Details and Texture
Once you’re happy with the overall shape of the rose, it’s time to add details and texture. Use your pencil to create subtle shadows and highlights on the petals. This will give the rose a sense of depth and realism. Pay attention to the way light falls on the petals and use shading to accentuate the curves and folds.
Step 7: Adding the Stem, Leaves, and Thorns
Now, add the stem, leaves, and thorns. The stem should be slightly curved and thicker at the base. The leaves are typically compound, so draw several leaflets attached to a central stem. Don’t forget to add thorns along the stem. These details add to the overall realism of the rose tattoo design.
Step 8: Outlining and Refining
Once you’re satisfied with the sketch, it’s time to outline the rose with a fine-liner pen or a darker pencil. Use smooth, confident lines to define the edges of the petals, stem, leaves, and thorns. Erase any unnecessary pencil lines and refine the details.
Step 9: Shading and Highlighting
Add shading and highlighting to create depth and dimension. Use a range of pencil grades to create subtle variations in tone. Darken the areas that are in shadow and lighten the areas that are in highlight. This will make the rose look more realistic and three-dimensional. The shading is critical when learning how to draw a rose tattoo that will translate well to skin.
Step 10: Adding Color (Optional)
If you want to add color to your rose tattoo design, you can use colored pencils, markers, or watercolors. Choose colors that complement the rose’s natural hues. Remember to blend the colors smoothly to create a realistic effect. Experiment with different color combinations to create unique and eye-catching designs. Consider what colors are most commonly used in rose tattoo art. [See also: Popular Tattoo Color Palettes].
Tips for Creating Unique Rose Tattoo Designs
- Experiment with Different Rose Varieties: Explore different types of roses, such as English roses, tea roses, or climbing roses. Each variety has its unique characteristics and petal arrangement.
- Incorporate Other Elements: Add other elements to your rose tattoo design, such as skulls, daggers, banners, or geometric shapes. This will create a more personalized and meaningful design.
- Play with Different Styles: Experiment with different tattoo styles, such as traditional, neo-traditional, watercolor, or blackwork. Each style has its unique aesthetic and techniques.
- Consider Placement: Think about where the tattoo will be placed on the body. This will influence the size, shape, and orientation of the design.
- Use High-Quality References: Always use high-quality reference images to ensure accuracy and realism.
Common Mistakes to Avoid When Drawing Rose Tattoos
- Ignoring Anatomy: Failing to understand the basic anatomy of a rose will result in a poorly drawn and unrealistic design.
- Overcomplicating the Design: Trying to add too many details can make the design look cluttered and confusing.
- Using Poor Shading: Inadequate shading will result in a flat and lifeless design.
- Neglecting Line Weight: Varying the line weight will add depth and dimension to the design.
- Rushing the Process: Taking your time and paying attention to detail will result in a higher-quality design.
The Symbolism of Rose Tattoos
Understanding the symbolism behind rose tattoos can add depth and meaning to your designs. Roses are often associated with:
- Love and Passion: Red roses are a classic symbol of romantic love and passion.
- Beauty and Grace: Roses are admired for their beauty and elegance.
- Hope and New Beginnings: Roses can also symbolize hope, new beginnings, and fresh starts.
- Loss and Remembrance: In some cultures, roses are used to commemorate loved ones who have passed away.
The color of the rose can also influence its symbolism. For example, yellow roses often represent friendship, while white roses symbolize purity and innocence. When learning how to draw a rose tattoo, considering its symbolic meaning adds another layer of artistic depth.
Practicing and Refining Your Skills
Like any skill, learning how to draw a rose tattoo takes practice. Don’t be discouraged if your first attempts aren’t perfect. The key is to keep practicing and refining your skills. Experiment with different techniques, styles, and compositions. The more you practice, the better you’ll become. Consider practicing on synthetic skin before committing to real skin. [See also: Best Practice Tattoo Techniques].
Conclusion
Learning how to draw a rose tattoo is a rewarding skill that can open up a world of creative possibilities. By understanding the anatomy of a rose, gathering the right supplies, and following the step-by-step guide outlined in this article, you can create stunning rose tattoo designs that are both beautiful and meaningful. Remember to practice regularly and experiment with different styles and techniques to develop your unique artistic voice. With dedication and perseverance, you’ll be able to create rose tattoos that are truly works of art. The ability to draw a rose tattoo is a valuable asset for any tattoo artist. Mastering this skill requires patience, practice, and a keen eye for detail. Now that you know how to draw a rose tattoo, you’re on your way to creating impressive artwork. Continue to learn how to draw a rose tattoo variations to expand your artistic capabilities.
