How to Paint a Tree in Acrylics: A Comprehensive Guide
Painting trees can be a rewarding artistic endeavor. Whether you’re a beginner looking to capture the essence of nature or an experienced artist seeking to refine your technique, understanding the nuances of painting trees in acrylics is essential. This guide provides a comprehensive approach to how to paint a tree in acrylics, covering everything from selecting the right materials to mastering various painting techniques. We will delve into the specifics of color mixing, brushwork, and creating realistic textures, ensuring you have the knowledge and skills to create stunning arboreal masterpieces.
Choosing Your Materials
Before embarking on your artistic journey, gathering the appropriate materials is paramount. The quality of your supplies will directly impact the final result. Here’s a breakdown of essential items:
- Acrylic Paints: Opt for a range of colors, including titanium white, burnt umber, ultramarine blue, cadmium yellow, and cadmium red. These primary colors allow you to mix a vast spectrum of hues. Consider adding a few earth tones like raw sienna and yellow ochre for more naturalistic results.
- Brushes: Invest in a variety of brush sizes and shapes. Round brushes are excellent for details, while flat brushes are ideal for covering larger areas. Filbert brushes offer versatility for both. Synthetic brushes are generally suitable for acrylics, as they hold their shape well and are easy to clean.
- Canvas or Painting Surface: A stretched canvas is a popular choice, but you can also use canvas boards, wood panels, or even heavy-duty watercolor paper. Ensure the surface is primed to provide a suitable base for the acrylic paint.
- Palette: A palette is essential for mixing your paints. A disposable palette or a wet palette (which keeps your paints moist for longer) are both good options.
- Water Container: A container of clean water is needed for rinsing your brushes.
- Palette Knife or Mixing Tool: For mixing paints efficiently.
- Paper Towels or Rags: For cleaning brushes and wiping away excess paint.
- Easel (Optional): An easel can provide a comfortable and stable painting surface.
Understanding Tree Anatomy
To paint realistic trees, it’s crucial to understand their basic anatomy. Trees consist of several key components:
- Trunk: The main support structure of the tree. Observe its shape, texture, and how it tapers towards the top.
- Branches: Branches extend from the trunk and support the foliage. Notice how they divide and subdivide, becoming thinner and more numerous as they reach the outer edges of the tree.
- Foliage: The leaves of the tree. Consider the shape, density, and color of the foliage.
- Roots (Often Hidden): Although not always visible, understanding the root system helps visualize the tree’s grounding and stability.
By studying real trees or photographs, you can gain a better understanding of these elements and how they interact. Pay attention to the overall form, the direction of growth, and the patterns created by the branches and foliage. This will inform your artistic decisions when you paint a tree in acrylics.
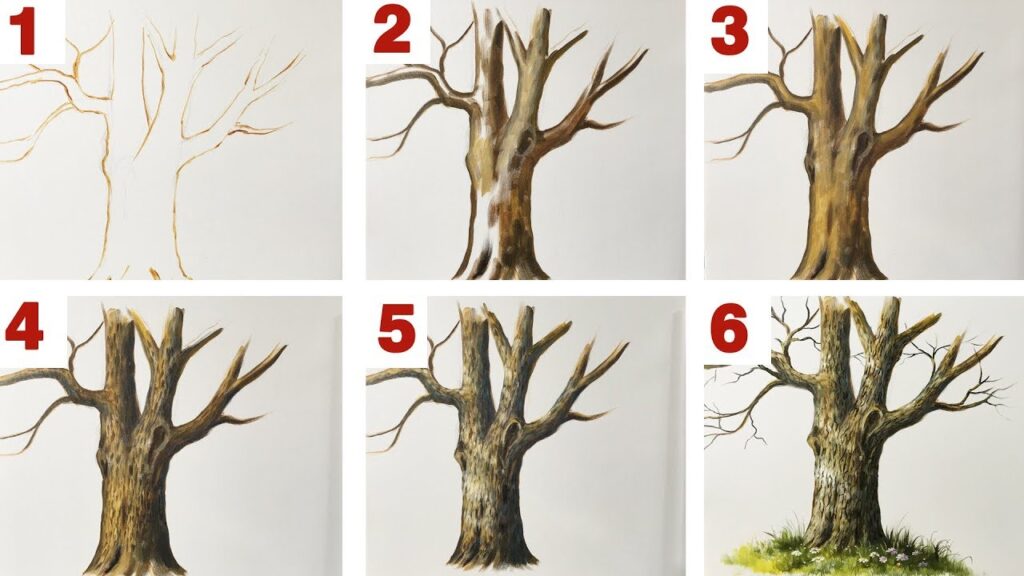
Step-by-Step Guide: Painting a Basic Tree
Let’s break down the process of painting a simple tree into manageable steps:
Step 1: Sketching the Outline
Lightly sketch the outline of the tree on your canvas. Use a soft pencil or charcoal to avoid leaving permanent marks. Focus on capturing the basic shape and proportions of the trunk, branches, and foliage. Don’t worry about details at this stage; the goal is to create a general framework for your painting.
Step 2: Blocking in the Base Colors
Mix your base colors. For the trunk, use a combination of burnt umber and a touch of ultramarine blue to create a realistic brown. For the foliage, mix different shades of green using cadmium yellow, ultramarine blue, and titanium white. Apply these colors to the corresponding areas of your sketch, using a large brush to cover the canvas quickly. This step is about establishing the overall color scheme and creating a foundation for subsequent layers.
Step 3: Adding Depth and Shadows
Introduce shadows to create depth and dimension. Mix darker shades of brown and green by adding more ultramarine blue or burnt umber to your base colors. Apply these darker tones to the areas where shadows would naturally fall, such as the underside of branches and the interior of the foliage. Consider the direction of the light source and how it affects the tree’s appearance. This is where you start to make the tree look three-dimensional when you paint a tree in acrylics.
Step 4: Highlighting and Detailing
Add highlights to the areas that are most exposed to light. Mix lighter shades of green and brown by adding titanium white or cadmium yellow to your base colors. Use a smaller brush to apply these highlights to the tips of branches, the edges of leaves, and other areas where light would naturally reflect. Pay attention to the texture of the tree bark and foliage, and use your brushstrokes to mimic these textures. Adding details enhances the realism and visual interest of your painting.
Step 5: Refining and Finishing Touches
Step back and assess your painting. Look for areas that need further refinement or adjustment. Add more details, adjust the colors, and refine the shadows and highlights as needed. Consider adding subtle variations in color and texture to create a more naturalistic effect. Once you are satisfied with the result, allow the painting to dry completely. You can then apply a varnish to protect the surface and enhance the colors.
Advanced Techniques for Painting Trees in Acrylics
Once you’ve mastered the basics, you can explore more advanced techniques to further enhance your tree paintings. Here are a few ideas:
Dry Brushing
Dry brushing involves using a brush with very little paint on it to create a textured effect. This technique is particularly useful for painting tree bark, foliage, and other rough surfaces. Load your brush with a small amount of paint, then wipe off most of it onto a paper towel. Lightly drag the brush across the canvas, allowing the bristles to catch on the texture and create a broken, uneven effect. This is a great way to add detail when you paint a tree in acrylics.
Layering
Layering involves applying multiple thin layers of paint on top of each other to create depth and complexity. This technique is particularly effective for painting foliage, as it allows you to build up a sense of density and variation. Start with a base layer of color, then gradually add more layers of different shades and hues, allowing each layer to dry before applying the next. This technique is crucial to understand how to paint a tree in acrylics with realism.
Glazing
Glazing involves applying a thin, transparent layer of paint over a dried layer of paint. This technique can be used to subtly alter the color or tone of an area, or to add depth and luminosity. Mix your glaze by thinning your acrylic paint with a glazing medium. Apply the glaze sparingly, and allow it to dry completely before adding another layer. Glazing can be used to create subtle variations in color and texture, adding depth and realism to your painting.
Palette Knife Painting
Using a palette knife instead of a brush can create interesting textures and effects. Load the palette knife with paint and apply it to the canvas in short, deliberate strokes. This technique is particularly useful for painting tree bark, foliage, and other textured surfaces. Experiment with different angles and pressures to create a variety of effects. You can paint a tree in acrylics using only palette knives for a unique look.
Tips for Painting Realistic Trees
Here are some additional tips to help you paint more realistic trees:
- Observe Real Trees: Spend time studying real trees in nature. Pay attention to their shape, texture, color, and how they are affected by light. Take photographs or make sketches to help you remember what you see.
- Consider the Season: The appearance of trees changes dramatically with the seasons. Consider the time of year when painting your tree. In spring, the foliage will be fresh and vibrant. In autumn, the leaves will be turning colors. In winter, the branches will be bare.
- Use a Reference Photo: If you’re struggling to visualize a tree, use a reference photo. This can help you with the composition, proportions, and details.
- Don’t Be Afraid to Experiment: The best way to improve your painting skills is to experiment with different techniques and approaches. Don’t be afraid to try new things and see what works for you.
- Practice Regularly: Like any skill, painting trees requires practice. The more you paint, the better you will become. Set aside time each week to practice your painting skills.
Common Mistakes to Avoid
Even experienced artists can make mistakes when painting trees. Here are some common pitfalls to avoid:
- Overly Symmetrical Trees: Real trees are rarely perfectly symmetrical. Avoid painting trees that look too uniform or artificial.
- Flat, Lifeless Foliage: Avoid painting foliage that looks flat and lifeless. Use a variety of colors and textures to create a sense of depth and dimension.
- Ignoring the Light Source: The light source is crucial for creating realistic shadows and highlights. Pay attention to the direction of the light and how it affects the tree’s appearance.
- Lack of Detail: Adding details is essential for creating realistic trees. Don’t be afraid to spend time adding small details to the bark, branches, and foliage.
Conclusion
Learning how to paint a tree in acrylics is a journey that combines technical skill with artistic observation. By understanding the anatomy of trees, mastering basic painting techniques, and experimenting with advanced methods, you can create stunning arboreal paintings. Remember to observe real trees, practice regularly, and don’t be afraid to experiment. With dedication and persistence, you’ll be able to capture the beauty and essence of trees on canvas. So, grab your brushes, mix your paints, and start painting your own masterpieces!
[See also: Acrylic Painting Techniques for Beginners]
[See also: How to Mix Realistic Green Colors]
