How to Take Out Acrylic Nails Safely: A Comprehensive Guide
Acrylic nails are a popular choice for those seeking a long-lasting and glamorous manicure. However, the time eventually comes when you need to remove them. Improper removal can damage your natural nails, leaving them weak, brittle, and prone to breakage. This guide provides a step-by-step approach on how to take out acrylic nails safely at home, minimizing damage and preserving the health of your natural nails.
Why Proper Removal Matters
Before diving into the methods, it’s crucial to understand why proper removal is so important. Acrylic nails are bonded to your natural nails using a strong adhesive. Attempting to simply peel or rip them off can tear layers of your natural nail plate, leading to:
- Thinning and weakening of the natural nails
- Increased sensitivity
- Rough and uneven nail surface
- Increased risk of infection
Therefore, taking the time to remove acrylics correctly is an investment in the long-term health and beauty of your nails. Learning how to take out acrylic nails the right way is essential for any acrylic nail enthusiast.
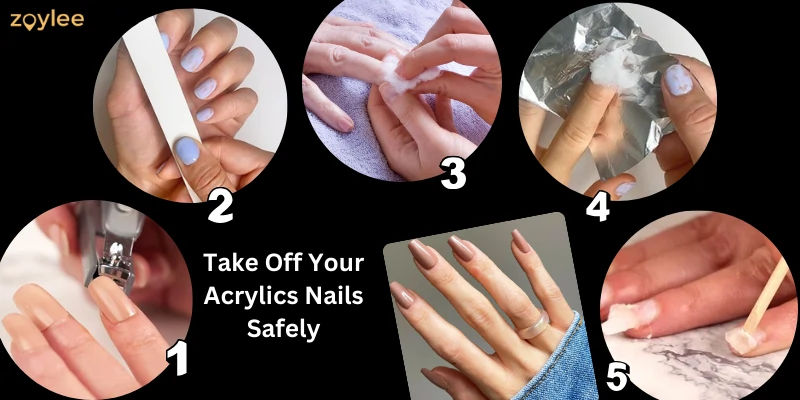
Method 1: The Acetone Soak (Most Recommended)
The acetone soak is the most effective and widely recommended method for removing acrylic nails. Acetone is a powerful solvent that breaks down the acrylic, allowing it to be gently removed. Here’s how to do it:
Materials You’ll Need:
- 100% Acetone
- Cotton balls
- Aluminum foil
- Nail file (coarse grit)
- Cuticle pusher
- Cuticle oil
- Bowl or small dish
- Optional: Warm water
Step-by-Step Instructions:
- File Down the Top Coat: Use a coarse-grit nail file to gently file down the top layer of the acrylic. This helps the acetone penetrate the acrylic more effectively. Be careful not to file down to your natural nail.
- Protect Your Skin: Apply a thick layer of petroleum jelly or cuticle oil around your cuticles and the skin surrounding your nails to protect them from the drying effects of acetone.
- Soak Cotton Balls in Acetone: Soak cotton balls in 100% acetone. Ensure they are thoroughly saturated.
- Apply to Nails: Place a soaked cotton ball directly onto each acrylic nail.
- Wrap in Foil: Wrap each fingertip tightly with aluminum foil to hold the cotton ball in place and prevent the acetone from evaporating.
- Soak for 20-30 Minutes: Allow the acetone to soak for 20-30 minutes. Check a nail after 20 minutes to see if the acrylic is softening. If not, continue soaking for another 5-10 minutes.
- Remove the Foil and Cotton: After the soaking time, remove the foil and cotton balls. The acrylic should be soft and pliable.
- Gently Push Off the Acrylic: Use a cuticle pusher to gently push the softened acrylic off your natural nail. If the acrylic is still resistant, do not force it. Soak for a few more minutes and try again.
- Buff Away Remaining Residue: If there is any remaining acrylic residue, gently buff it away with a fine-grit buffer.
- Hydrate and Nourish: Wash your hands with soap and water, and then apply cuticle oil and hand lotion to rehydrate your skin and nails.
This method is considered the gold standard for how to take out acrylic nails because it minimizes damage when done correctly.
Method 2: The Warm Water Soak (Slower, But Gentler)
If you’re looking for a less harsh alternative, the warm water soak method can be used, although it’s significantly slower and may not work as effectively for all types of acrylics. This method relies on weakening the adhesive bond with prolonged exposure to warm water.
Materials You’ll Need:
- Warm water
- Dish soap (optional)
- Nail file (coarse grit)
- Cuticle pusher
- Cuticle oil
- Bowl
Step-by-Step Instructions:
- File Down the Top Coat: As with the acetone method, begin by filing down the top layer of the acrylic.
- Soak in Warm Water: Fill a bowl with warm (not hot) water. You can add a few drops of dish soap to help break down the adhesive.
- Soak for 30-45 Minutes: Soak your fingertips in the warm water for 30-45 minutes. Check the nails periodically to see if the acrylic is loosening.
- Gently Push Off the Acrylic: After soaking, use a cuticle pusher to gently push the acrylic off your natural nail. If it’s still resistant, continue soaking for another 15-20 minutes.
- Buff Away Remaining Residue: Gently buff away any remaining acrylic residue.
- Hydrate and Nourish: Wash your hands and apply cuticle oil and hand lotion.
This method of how to take out acrylic nails is less damaging, but takes significantly longer and might not work for all acrylic types.
Method 3: Dental Floss (Use with Extreme Caution)
This method involves using dental floss to separate the acrylic nail from the natural nail. It should only be attempted with extreme caution, as it carries a higher risk of damaging your natural nails.
Materials You’ll Need:
- Dental floss (waxed)
- Cuticle pusher
- Cuticle oil
Step-by-Step Instructions:
- Loosen the Edges: Use a cuticle pusher to gently lift the edges of the acrylic nail.
- Insert the Floss: Carefully slide the dental floss underneath the lifted edge of the acrylic nail.
- Saw Back and Forth: Gently saw back and forth with the floss, working your way down the nail. Be extremely careful not to apply too much pressure, as this can tear your natural nail.
- Remove the Acrylic: Once the floss has separated the acrylic nail, gently remove it.
- Hydrate and Nourish: Apply cuticle oil to your nails.
This method of how to take out acrylic nails is not recommended due to the high risk of damage. Only attempt as a last resort and with extreme caution. [See also: How to Repair Damaged Nails After Acrylics]
Aftercare: Restoring Your Natural Nails
Regardless of the method you choose, your natural nails will likely be somewhat weakened and dehydrated after removing acrylics. Here are some tips for restoring their health:
- Keep Nails Short: Trim your nails short to prevent breakage.
- Moisturize Regularly: Apply cuticle oil and hand lotion several times a day to keep your nails and skin hydrated.
- Use a Nail Strengthener: Apply a nail strengthener or hardener to help protect and strengthen your nails.
- Avoid Harsh Chemicals: Limit your exposure to harsh chemicals, such as cleaning products, which can further dry out your nails. Wear gloves when doing household chores.
- Eat a Healthy Diet: A diet rich in vitamins and minerals, especially biotin, can promote healthy nail growth.
- Consider a Break: Give your nails a break from acrylics for a few weeks to allow them to fully recover.
Proper aftercare is just as important as the removal process when considering how to take out acrylic nails without causing significant damage.
Common Mistakes to Avoid
To ensure a safe and successful removal process, avoid these common mistakes:
- Peeling or Ripping Off Acrylics: This is the biggest mistake you can make. It will severely damage your natural nails.
- Using Force: If the acrylic is not easily coming off, do not force it. Soak for longer or try a different method.
- Neglecting Cuticle Care: Acetone can be very drying, so protecting your cuticles is essential.
- Ignoring Aftercare: Failing to moisturize and strengthen your nails after removal can prolong the recovery process.
Conclusion: Taking Control of Your Nail Health
Removing acrylic nails at home is possible with the right techniques and a little patience. By following the steps outlined in this guide, you can learn how to take out acrylic nails safely and effectively, minimizing damage to your natural nails. Remember to prioritize the health of your nails and take the time to do it right. With proper care and attention, you can enjoy beautiful acrylic nails without sacrificing the health of your natural nails.
Understanding the best practices for how to take out acrylic nails empowers you to maintain healthy and beautiful nails, whether you choose to continue with acrylics or embrace your natural nail look. [See also: The Ultimate Guide to Nail Care]
