Refill Acrylic Nails: A Comprehensive Guide to Maintenance and Longevity
Acrylic nails are a popular choice for those seeking a durable and customizable manicure. However, like any beauty treatment, acrylic nails require regular maintenance to keep them looking their best and to prevent damage to the natural nail. This guide provides a comprehensive overview of refill acrylic nails, covering everything from the reasons behind refills to the step-by-step process and aftercare tips.
Why Refill Acrylic Nails?
As your natural nails grow, a gap appears between the cuticle and the acrylic. This gap not only looks unsightly but also creates a potential space for moisture and bacteria to accumulate, leading to infections. Refilling acrylic nails addresses these issues by:
- Maintaining the appearance: Refills eliminate the visible gap, keeping your manicure looking fresh and polished.
- Preventing lifting: Lifting occurs when the acrylic separates from the natural nail. Refills help to re-secure the acrylic, preventing it from lifting and potentially damaging the underlying nail.
- Reducing the risk of infection: By filling the gap, refills prevent moisture and bacteria from getting trapped, minimizing the risk of fungal or bacterial infections.
- Strengthening the nail structure: Regular refills reinforce the acrylic, making it less prone to breakage and extending the life of your manicure.
When to Refill Acrylic Nails
The frequency of refills depends on the growth rate of your natural nails. Generally, refill acrylic nails are recommended every 2-3 weeks. If you notice significant gaps, lifting, or any signs of infection, it’s crucial to schedule a refill appointment sooner rather than later. Ignoring these signs can lead to more serious problems and potentially require removal of the acrylics.
The Refill Acrylic Nails Process: A Step-by-Step Guide
The refill acrylic nails process typically involves the following steps:
- Preparation: The nail technician will begin by sanitizing their hands and your hands to prevent the spread of bacteria. They will then gently push back your cuticles and file down the existing acrylic to smooth out any unevenness.
- Filing and Shaping: The technician will carefully file down the existing acrylic to blend it seamlessly with the new growth. They will also reshape the nails to your desired shape and length. This step is crucial for a natural and aesthetically pleasing result.
- Priming: A primer is applied to the natural nail growth. This helps the new acrylic adhere properly and prevents lifting.
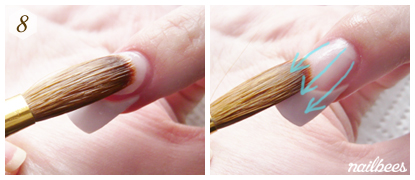
- Acrylic Application: Using a brush, the technician will apply a small bead of acrylic to the gap between the cuticle and the existing acrylic. They will carefully blend the new acrylic with the old, creating a smooth and even surface.
- Shaping and Filing (Again): Once the acrylic has dried, the technician will further refine the shape and smooth out any imperfections. This may involve using different grits of files to achieve the desired finish.
- Buffing: The nails are then buffed to create a smooth and shiny surface. Buffing also helps to remove any scratches or imperfections.
- Finishing Touches: Finally, a top coat is applied to protect the acrylic and add shine. The technician may also apply cuticle oil to moisturize the surrounding skin.
DIY Refill Acrylic Nails: Is It Possible?
While it’s technically possible to refill acrylic nails at home, it’s generally not recommended unless you have significant experience and the right tools. The process requires precision and skill, and mistakes can lead to damage to your natural nails or an uneven and unnatural-looking manicure. [See also: Removing Acrylic Nails Safely] If you’re considering a DIY refill, be sure to do your research and watch plenty of tutorials before attempting it. It’s often more cost-effective and safer to visit a professional nail technician.
Tools Required for DIY Refill Acrylic Nails
If you decide to attempt a DIY refill, you’ll need the following tools:
- Acrylic powder and liquid monomer
- Acrylic brush
- Nail file (various grits)
- Nail buffer
- Cuticle pusher
- Nail primer
- Top coat
- Sanitizer
- Dust brush
Ensure all tools are clean and sanitized before use to prevent infection. Invest in good quality products for best results and longevity of your refill acrylic nails.
Potential Risks of Improper Refills
Improperly refilling acrylic nails can lead to several problems, including:
- Infections: Trapped moisture and bacteria can cause fungal or bacterial infections.
- Lifting: Poor adhesion can lead to lifting, which can damage the natural nail.
- Thinning of the natural nail: Over-filing can weaken and thin the natural nail.
- Breakage: Uneven application can make the acrylics more prone to breakage.
Aftercare Tips for Refill Acrylic Nails
Proper aftercare is essential for maintaining the health and appearance of your refill acrylic nails. Here are some tips:
- Moisturize regularly: Apply cuticle oil and hand cream daily to keep your nails and skin hydrated.
- Avoid harsh chemicals: Wear gloves when cleaning or working with harsh chemicals.
- Don’t pick or bite your nails: This can damage the acrylics and your natural nails.
- Schedule regular refills: Stick to a 2-3 week refill schedule to prevent problems.
- Be gentle: Avoid using your nails as tools, as this can cause them to break or lift.
Choosing a Nail Technician for Refill Acrylic Nails
Selecting the right nail technician is crucial for a successful refill acrylic nails experience. Look for a technician who is experienced, qualified, and uses high-quality products. Read reviews and ask for recommendations from friends or family. A good technician will listen to your concerns, provide expert advice, and prioritize the health of your natural nails.
Cost of Refill Acrylic Nails
The cost of refill acrylic nails can vary depending on the salon, the technician’s experience, and the complexity of the design. Generally, refills are less expensive than a full set of acrylics. Expect to pay between $20 and $40 for a basic refill. More elaborate designs or additional services may increase the price. It’s always a good idea to inquire about the price before your appointment.
Troubleshooting Common Issues with Refill Acrylic Nails
Even with proper care, you may encounter some issues with your refill acrylic nails. Here are some common problems and how to address them:
- Lifting: If you notice lifting, avoid picking at it, as this can worsen the problem. Schedule an appointment with your nail technician to have it repaired.
- Cracking or breaking: If your acrylics crack or break, it’s important to have them repaired promptly to prevent further damage.
- Infection: If you suspect an infection (redness, swelling, pain), consult a doctor or dermatologist immediately.
The Future of Acrylic Nail Refills
The beauty industry is constantly evolving, and new techniques and products are always emerging. The future of refill acrylic nails may involve more advanced materials, such as gel-based acrylics, which are known for their flexibility and durability. Additionally, advancements in technology may lead to more precise and efficient refill methods. [See also: The Latest Trends in Nail Art] As the demand for acrylic nails continues to grow, we can expect to see even more innovation in the field.
Conclusion
Refill acrylic nails are an essential part of maintaining a beautiful and healthy manicure. By understanding the process, following proper aftercare tips, and choosing a qualified nail technician, you can enjoy long-lasting and stunning acrylic nails. Remember to prioritize the health of your natural nails and address any issues promptly to prevent complications. With the right care, your acrylic nails can be a stylish and confident expression of your personal style.
